Prinsesstårta … or simply a princess cake for #Pinktober

“Cake is happiness! If you know the way of the cake, you know the way of happiness! If you have a cake in front of you, you should not look any further for joy!”
C. JoyBell C.

Prinsesstårta … a princess cake my way to mark Pinktober. Every October begins with a pink cake in support of breast cancer research, or Pinktober, as it is popularly known. October is the National Breast Cancer Awareness month. International campaigns are run each year to raise awareness and funds for research. In addition, the campaign also offers information and support to those affected by breast cancer.

The first week of October sees Mr PABs birthday and he’s grown used to a pink birthday cake. I might be torn for time, tired to the bone, might not bake a cake on any other occasion but the Pinktober one is never missed. Neither is the ribbon. You can see the pink on my earlier  Pinktober posts, else catch them on my PINK board on Pinterest.

The pink ribbon is an international symbol of breast cancer awareness. Pink ribbons, and the color pink in general, identify the wearer or promoter with the breast cancer brand and express moral support for women with breast cancer. Pink ribbons are most commonly seen during National Breast Cancer Awareness Month.

A Princess cake or prinsesstårta is the lads most favourite cake of all time. Years ago I did a recipe testing for Helene of Tartlette which included a Bavarian cream. That was a princess cake of sorts. We still remember how fantastic that cake was, a benchmark of sorts for birthday cake.

A princess cake (prinsesstårta in Swedish) is a traditional Swedish layer cake consisting of alternating layers of airy sponge cake, raspberry or strawberry jam, pastry cream, and a thick-domed layer of whipped cream. This is topped by marzipan, giving the cake a smooth rounded top. The marzipan overlay is usually green, sprinkled with powdered sugar, and often decorated with a pink marzipan rose.[1][2]

The original recipe first appeared in the 1930s Prinsessornas Kokbok cookbook, which was published by Jenny Åkerström, a teacher of the three daughters of H.R.H. Prince Carl, Duke of Västergötland. The cake was originally called grön tårta (green cake), but was given the name prinsesstårta or “princess cake” because the princesses were said to have been especially fond of the cake.

My version of the prinsesstårta is a little off the traditional mark, just slightly. The layers of the traditional Swedish cake have jam and pastry cream. I skipped the jam as I thought my pastry cream was sweet enough. The dome of whipped cream wasn’t going to happen as I used a low fat 20% cream, so I stabilised it with gelatin. The dome happened in an upside down manner which is how I built up the cake and left it to set overnight.

I hoped it would look fine the next morning …and it certainly did much to my delight! The other deviation was of course the marzipan cover for the cake. I made marzipan too that morning but it did not behave. At all. With October being unseasonably warm at 40C this year, the marzipan really sweated and wouldn’t roll out.

I had to do a rapid rethink as I didn’t want to jeopardise the poor stabilised dome. That would have been a disaster so my next best option was a chocolate coating, tricky but doable. The idea is to have the chocolate coating at a cool, or almost same temperature as the cream dome so that the dome doesn’t melt. It was touch and go. I won!! Sort of.

The dome wasn’t as smooth as I expected it to be, or like I wanted it to be but given the weather, I was happy I had the cake covered! Left to set in the fridge, you can see the uneven bits, or maybe refer to it as an artisanal finish? Taking pictures was difficult again as the icing threatened to melt.

I used the marzipan to make a couple of hurried roses etc. Then the quintessential PINK ribbon. Minimalistic was the sensible and possibly only way to go. Stuck it all on and was just grateful to have a cake. Once cut, the honours done, it was fantastic to taste.

Much to my delight, the boy immediately exclaimed, “Yay, a Princess Cake! I just saw it on the Simpsons this morning.” What a delicious coincidence! The prinsesstårta layers behaved well while being sliced, the cake itself a winner on all counts {other than smooth looks!}. Light, airy, flavourful, creamy and a celebration! Try and challenge yourself to make this, right side up if possible, else use my way home. This is a cake every baker must make at least once. Must!

I’ve done a real fun version of Swedish Prinsesstårta Cupcakes with the Daring Bakers in May 2013. It was hot as hot can be back then, but much easier to do little cupcakes than one huge domed prinsesstårta. Also, then the marzipan was store bought and possibly more smoother and easier to handle than home made. If you rather do pretty cupcake prinsesstårta, then here’s the place to be.

[print_this]Recipe: Prinsesstårta, Princess cake for Pinktober

Summary: Prinsesstårta. Light, airy, flavourful, creamy and a celebration! Try and challenge yourself to make this, right side up if possible, else use my way home. This is a cake every baker must make at least once. Serves 10-12

Prep Time: 1 hour Total Time: 2 hours plus cooling, chilling time
Ingredients:

  • Strawberry sponge {Make 2 X 3 egg cakes}
  • 6 eggs
  • 170g sugar
  • 170g plain flour
  • 1 1/2 tsp baking powder
  • pinch salt
  • 1 tsp strawberry essence
  • 1 tsp vanilla bean powder {or vanilla extract}
  • 1 tbsp Grand Marnier {optional}
  • few drops red food colour {optional}
  • Simple sugar syrup
  • 25ml water
  • 50g sugar
  • Pastry Cream
  • 4 eggs
  • 100g sugar
  • 40g cornflour
  • 250ml milk
  • 200ml low fat cream
  • 1 vanilla bean, scraped
  • Whipped Cream
  • 400ml low fat cream, chilled
  • 1 tsp gelatin, sprinkled over 2 tbsp warm milk, cooled
  • 75g icing sugar
  • 1 tsbp Grand Marnier, optional
  • Chocolate coating
  • 200g 70% dark couverture chocolate
  • 80g unsalted butter
  • 20g honey
  • Marzipan for roses and ribbon etc

Method:

  1. Sponge Cake
  2. Line 2 loose bottomed 8″ baking tins with parchment paper.
  3. Place the eggs and sugar in a large bowl and whip on high speed till thick and moussey, 8-10 minutes. Add the strawberry essence, pinch of salt, baking powder and vanilla bean powder {and liqueur and food colour if using} and beat again.
  4. Sift over the flour in 4 lots, gently folding in each time.
  5. Transfer the batter into the 2 tins and bake at 190C for 35-45 minutes until done.
  6. Cool on racks, then cut horizontally into 2 layers each.
  7. Pastry Cream
  8. Whisk the egg yolks and sugar with a wooden spoon in a big bowl until the mixture becomes pale and light. Stir in the flour slowly until it is thoroughly mixed with the egg mixture.
  9. Pour the boiling milk into the mixture a little by little while whisking continuously to avoid curdling. And then stir in the rest of the cream until the mixture is well combined.
  10. Transfer the whole mixture into a pot, with the seeds scraped from the vanilla bean, and heat it under low setting. Stir it constantly with the wooden spoon or spatula scraping the sides and bottom until it has thickened quite  a bit.
  11. Once the custard has thickened, take it off the heat, and strain it into a clean bowl. Cover top with plastic wrap, cool and chill.
  12. Once chilled, whip in 1 cup of the reserved whipped cream from below until silky smooth. The pastry cream will be quite thick.
  13. Thermomix Recipe
  14. Place sugar and vanilla bean in TM bowl, and process for 30seconds on speed 10.
  15. Add remaining ingredients, plus vanilla bean shell and cook on 90C/Speed 4 for 7 minutes {until thick}. Strain into a bowl immediately to cool. I chilled it overnight.
  16. Sugar Syrup
  17. Place sugar and water in small pan, simmer until the sugar melts. Cool.
  18. Whipped cream
  19. Whip cream and sugar on high speed until medium high peaks form. Whip in liqueur if using. Gently fold in the gelatin mixture. Reserve 1 cup for pastry cream
  20. Assemble
  21. Take a glass bowl the top of which can comfortably fit the cake {think upside down}. Line it with cling wrap overlapping the sides.
  22. Turn the whipped cream into the bowl, level out and place the first layer of sponge on it. Paint with sugar syrup, and add 1/3rd pastry cream. Level it out. Repeat with the remaining layers of sponge, using the sugar syrup and pastry cream.
  23. {I used mousse strips to keep the side of the sponge and pastry cream in place}
  24. Cover the bowl with cling wrap or foil, and lave to set in the fridge as is {cream side at the bottom}
  25. Next morning, turn the cake onto your serving platter, and gently peel off the plastic wrap that lined the bowl. {Refer picture}
  26. Chocolate coating
  27. Place chocolate, butter and honey in a heatproof bowl and melt over double boiler until the chocolate is melted. Stir until smooth. Cool to a nice room temperature {the chocolate shouldn’t be warm at all else it will melt the dome}
  28. Gently pour over the cake so that the chocolate covers the dome right around.
  29. Chill in fridge
  30. Garnish with marzipan roses etc if required.
  31. Chill until ready to serve.
  32. Slice with a sharp knife dipped in hot water and wiped dry to get neat slices.

[/print_this]

  •  

Don’t miss a post
Also find me on The Rabid Baker, The Times of India

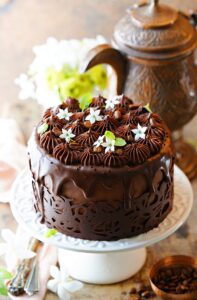
Dark Chocolate Wholegrain Brown Sugar Cake … wholesome and delicious

“Always keep a smile on your face, a rainbow in your heart, and some dark chocolate on hand!”

Dark Chocolate Wholegrain Brown Sugar Cake … seems like a load of dark chocolate and wholegrain happening on PAB of late. That’s where my heart lies. Whether it’s brownies, cookies or biscotti or then cake, wholegrain is the preferred choice, and often dark chocolate the perfect partner in crime!

I must confess that I begin with ‘no chocolate‘ in my intentions, but somewhere along the way cocoa and chocolate find their way into the mix or batter. It’s happened umpteen times, and now I wonder if I function on ‘auto chocolate’?

So this Dark Chocolate Wholegrain Brown Sugar Cake is inspired by the Muscavado Sugar Cake in a brilliant book ‘Good To The Grain‘. I bought the book a few years ago, and it continues to hold pride o f place on my book shelf. I might not bake out of it often, but its a constant source of inspiration alright. Just leafing through the pages gets my creativity going!

Talk about inspiration. So while I was making the cake, unsure of course whether it would work out fine or not, I thought I’d experiment with the styling.  I sometimes find chocolate challenging to shoot so figured I would experiment a little. You see I am headed off to the IFBM in Bangalore to host a food styling workshop. With just a clutch of days to go, the butterflies in my stomach flutter non stop.

It’s just an hours workshop and my first dedicated food styling one. I am super excited and want to cram everything I know into that one precious hour. That’s not going to happen of course, but I am trying. Food styling is so personal, it reflects a bit of you, yet it is so infinite.

That’s the thing about food photography. Just keep experimenting with different, styles, different porps, changing light… it’s this practice that helps you grow. The possibilities are infinite. Much like the pleasure you get from seeing the results! So while the recipe is to feed the blog, the few different snapshots head off to the IFBM!

I enjoy using wholegrains in my recipes, and this one is a hearty and delicious one. Getting amaranth in there made it even better. You can experiment with different combinations, even skip the cocoa like in the original recipe from the book. Oh yes, and try and use unrefined mineral sugars. Make it a habit. I have!


[print_this]

Recipe: Dark Chocolate Wholegrain Brown Sugar Cake

Summary: Dark, moist and divinely chocolaty, this Dark Chocolate Wholegrain Brown Sugar Cake is sure to be a crowd pleaser. A great tea tray bake, a picnic cake or a tiffin filler, this is sure to become a favourite soon.

Prep Time: 15 minutes
Total Time: 40 minutes
Ingredients:

  • 45g amaranth flour
  • 80g wholewheat flour
  • 25g cocoa
  • 20g almond m
  • 1 tsp baking powder
  • pinch salt
  • 100g butter, chilled, cubed
  • 3 eggs, separated
  • 175g brown sugar
  • 1 tsp vanilla extract
  • 50g dark chocolate chips {optional}

Method:

  1. Preheat the oven to 180C. Line an 8 X 8″ square baking tin.
  2. In the jar of the food processor, place the amaranth, whole wheat, almond meal, cocoa, baking powder and salt. Pulse briefly to mix and lighten.
  3. Add the chilled butter and pulse briefly to get a breadcrumb like mix. Reserve.
  4. Beat the egg whites to soft peaks. Add 75g brown sugar and beat again until stiff. Place about a 1/4 cup in a piping bag {for marbling on top if desired}. Reserve rest
  5. Beat the egg yolks with remaining sugar in a large bowl until light and moussey, almost 5-7 minutes. Add vanilla an d beat again.
  6. Gently fold in dry mix, followed by the beaten egg whites. Fold lightly but uniformly. Add chocolate chips if using and gently mix again.
  7. Turn into prepared tin, pipe squiggles of reserved beaten egg white if desired.
  8. Bake for abut 25-30 minutes or until a tester comes out with a few moist crumbs on it.
  9. Cool on rack for about 30 minutes. Serve warm, at room temperature or chilled.

[/print_this]

Don’t miss a post
Also find me on
The Rabid Baker, The Times of India

tures PAB/2011/07/anigif-mobile-app.gif” alt=”” width=”350″ height=”50″ />

Peaches & Cream Cake … light summer cake. Trifles too!

“Cake is happiness! If you know the way of the cake, you know the way of happiness! If you have a cake in front of you, you should not look any further for joy!”
C. JoyBell C.

It was a Peaches & Cream Cake for my father’s birthday last week. Everything was going according to plan,and I toyed around with summer cake ideas in my head. Summer is for stone fruit, and the cake would most certainly have some! Peaches! I had a kilo of them in the fridge. Cream? Yes of course; there’s always some on hand. Time for peaches and cream!!

Despite knowing that whipping cream in miserable summer heat is sure to fail, I marched ahead. At 43C, life was never going to be a cake walk in the record breaking heat and humidity we have had this summer. That the rains failed added to my misery. 75% humidity and everything looks like it’s condensing! Not the best weather to work with cream cakes in ……

…and then it was time for a power breakdown. It had been assembled but a cake needs chilling you know. I stuck the cake into the fridge and we finally left for dinner. The cake survived as power was back when we returned. I thanked my lucky stars that it held together until we cut it, well almost. It was YUM!

Oh, did I tell you I never got to my kilo of peaches? Yes that happened too. With all the unnecessary drama of no power, I just reached out for a tin of canned peaches; probably my best idea that day. Another good idea was the  Crème patisserie I made for the frosting … finger licking good. 

I saved some cream and peaches; enough to make a few trifles. Layered the same way as the cake, they were fun to assemble … and eat of course! The goblets are one of my favourites from Urban Dazzle. I use them often for different stuff like Dark Chocolate Mousse, Peach Lime Coolers & Stone Fruit Salads.

[print_this]Recipe: Peaches & Cream Cake

Summary: A light summery birthday cake, the  crème patisserie lends a nice, deep flavour to the frosting on the Peaches & Cream Cake. Use fresh peaches or even apricots in season. The cake would work really well with mangoes too.
Prep Time: 25 minutes
Total Time: 1 hour plus cooling , chilling time
Ingredients:

  • Sponge Cake {Make 2 X 3 egg sponges}
  •  3 eggs
  • 100g Castor sugar
  • 70g plain flour
  • 1tsp baking powder
  • pinch salt
  • Filling & topping
  • 500g low fat cream, chilled
  • 75g icing sugar {adjust as per requirement}
  • 1 850g tin peach halves {I used Del Monte}
  • Crème patisserie {can be made a day before}
  • 200ml low fat cream
  • pinch salt
  • 2 eggs
  • 1 vanilla bean scraped
  • 50g sugar
  • 15g cornflour

Method:

  1. Sponge Cake
  2. Preheat the oven to 180 degrees C. Line, grease & a 7″ loose bottomed tin.
  3. {If your oven in big, bake 2 X 7″ cakes together}
  4. Sift the flour, baking powder and salt 3 times. Reserve.
  5. Beat the eggs, essence & sugar till mousse like {almost 10 minutes}.>
  6. Lightly fold the flour in 3 goes in figure 8 movements (so as no to release the air bubbles).
  7. Gently turn into prepared tin & bake for 20-25 minutes till light brown & spongy.
  8. Repeat for 2nd cake.
  9. Cool on racks completely, then slice horizontally into 2 layers each
  10. Filling
  11. Whip all ingredients together to medium peaks.
  12. Crème patisserie
  13. Bring cream and a pinch of salt to a gentle boil in a pot.
  14. In the meantime, whisk the egg yolks and sugar with a wooden spoon in a big bowl until the mixture becomes pale and light. Stir in the cornflour slowly until it is thoroughly mixed with the egg mixture.
  15. Pour the boiling cream into the mixture a little by little while whisking continuously to avoid curdling.
  16. Transfer the whole mixture into a pot, with the seeds scraped from the vanilla bean {throw in the shell too}, and simmer over low heat. Stir it constantly with the wooden spoon or spatula scraping the sides and bottom until it has thickened.
  17. Once the custard has thickened, take it off the heat, and strain it into a clean bowl. Add a dash of peach liqueur if desired. Cool, cover with cling wrap touching the surface, then chill for a few hours. This is going to be very thick.
  18. Assemble
  19. Drain the peaches and slice 3-4 halves for topping. Chop up the rest.
  20. Reserve the peach syrup to moisten the sponge with.
  21. Reserve 1 cup of whipped cream for the frosting.
  22. Place 1 layer of sponge on serving platter, moisten with reserved peach syrup, top with 1/3 whipped cream, and 1/3rd chopped peaches. Repeat with remaining layers.
  23. Loosen the chilled crème patisserie and gently fold in the reserved whipped cream. Don’t whisk briskly or it will become too floppy for frosting.
  24. Taste and adjust sweetness if required. Frost the top and sides of cake with it.
  25. Top with peach slices, chill for at least half an hour for flavours to mature.

[/print_this]

Don’t miss a post
Also find me on The Rabid Baker, The Times of India

Wholewheat Almond Buttermilk Pound Cake … with almond cream & fresh strawberries

“The great thing about cake is it doesn’t feel like work. You forget about work. Kids, adults, they all get the same look in their eye when they’re decorating cakes… That’s the magic right there.”
Duff Goldman

 Wholewheat Almond Buttermilk Pound Cake … made on the trot the other day before dashing off to Bangalore. There was a young, enthusiastic photographer coming over to shoot my profile for a newspaper feature on The New Indian ExpressIt’s a Feast For the Eyes. How could I not bake a cake?

There was plenty of stuff baked as I was going to be away for 2 days. Some Coffee Shortbread Cookies which I quickly turned into Coffee Shortbread Nutella Sandwich Cookies {absolutely divine}. Also on hand some recently baked Amaranth Oat Walnut Ginger Cookies {gluten free and eggless}, and a batch of Wholewheat Dark Chocolate Walnut Brownies. Of course, there is  always GF Multigrain Granola at home too …Yet, what’s a food porn photo-shoot sans cake? It was a mad rush that day so I had to keep it simple. Short on time, I reached for one of my most trusted recipes, a buttermilk pound cake which has evolved over the years. It’s a basic recipe that works with infinite combinations; a recipe never short on ideas!

I’ve made a buttermilk pound cake a million times in many avatars, my to-go recipe that lives in my head! Some of my favourites versions are the Buttermilk Chocolate Pound Cake, Whole Wheat Coffee Dark Chocolate Pound Cake and the Tres Leches Wholewheat Lemon Pound Cake.

This one turned out to be a hit too. Light, full of flavour with a silky almond whipped cream topping. Fresh sweet strawberries added the right oomph to it; a burst of colour too. You can use any seasonal berries, actually any seasonal fruit for that matter. Mangoes, litchi, kiwi, oranges, plums … all fruit pair well with almond and vanilla!

Photography is sacrosanct and as vital as the written content for Deeba Rajpal, a celebrated food blogger from Gurgaon, who churns out scrumptious recipes and snaps their exquisite replicas for her website Passionate About Baking.

“We eat with our eyes first cannot be understated in today’s increasingly visual and dynamic world. The photographs should complement the recipe and build a food connect with the reader,” says Deeba, who banks on her aesthetic sense, eye for detail and Canon camera for desired captures. read the rest of the feature on TNIE

[print_this]Recipe: Wholewheat Almond Buttermilk Pound Cake

Summary: A healthier & delicious version of the pound cake, one that works with infinite combinations; a recipe never short on ideas! The good thing about the Wholewheat Almond Buttermilk Pound Cake is that is made of whole grain only. Another plus that it doubles up as a tea time favourite, a snack box filler AND a light, healthy dessert too!

Prep Time: 15 minutes
Total Time: 1 hour, 15 minutes
Ingredients:

  • Wholewheat Almond Buttermilk Pound Cake
  • 150g whole wheat flour
  • 55g almond meal
  • 1/2 tsp baking powder
  • 1/4 tsp baking soda
  • 1/4 tsp salt
  • 100g unsalted butter, room temperature
  • 200g vanilla sugar
  • 2 eggs
  • 1 tsp vanilla extract
  • 1/4 tsp almond extract
  • 1/2 tsp vanilla bean powder
  • 100ml cultured buttermilk
  • Almond Whipped Cream
  • 100ml low fat cream, chilled
  • 30g icing sugar
  • Few drops almond extract
  • 50-75 fresh strawberries
  • Handful fresh mint leaves

Method:

  1. Wholewheat Almond Buttermilk Pound Cake
  2. Grease and flour the sides of a 8″ ring tin, Line the bottom and sides with baking parchment.
  3. Preheat the oven to 170C.
  4. Sift the wholewheat and almond flour / almond meal with the baking powder, baking soda and salt. Reserve.
  5. Cream the butter and sugar. Beat in eggs one at a time, followed by the vanilla extract, almond extract and vanilla bean powder.
  6. With beater on low add the flour mix and buttermilk alternately in three lots.
  7. Bake for 50-60 minutes till golden brown on top, and the tester comes out clean.
  8. Top with almond whipped cream and fresh strawberries.
  9. Almond whipped cream
  10. Whip the cream, sugar and almond extract until medium peaks.

[/print_this]

Don’t miss a post
Also find me on The Rabid Baker, The Times of India

Whole Wheat Lemon Tres Leches Cake

“Sometimes things become possible if we want them bad enough.”
T.S. Eliot

Whole Wheat Lemon Tres Leches Cake … a healthier, whole grain version of an international favourite. The cake was as delicious as it was simple and rather plain in appearance. A healthy makeover, a cake I was inspired to make a while ago with leftover ‘tres leches‘ or 3 milk syrup from a Daring Bakers challenge. Then I had made a much fancier layered Mango Pastel de Tres Leches or Mango Three Milk Cake.

I forgot to share the whole wheat version until the other day when I was trying to dream up some app ideas for an Indiblogger event I attended. One thought led to another, and also took me back to the Whole Wheat Lemon Tres Leches Cake which I had forgotten to share as promised.

But first a little introduction to the event that inspired me to ‘wish‘! It was an interesting evening which launched Season II of the Your Wish is My App meet with Indiblogger and Nokia Lumia. It promised to be an entertaining evening with a live wire bunch of folk on stage. The line up included New York based, Michelin starred celebrity chef Vikas Khanna, TV anchor and  super gadget guru Rajiv Makhni, and someone best known as the father of the Indian gaming industry, Vishal Gondal.

That it would be entertaining was expected; that it would be side splitting funny, hysterical laughs and packed with madness and mayhem wasn’t. The trio kept us in splits, a 100% engaging and interactive. The crowds loved them, especially Vikas Khanna who wears his heart on his sleeve. The attendance crossed 300 and for a while the stage shuddered under the weight of almost everyone who wanted to be ‘there with the guys’!

Photo courtesy Vj Sharma @ Photo Journey

With sound touching the ‘are you crazy‘ levels, it was an entertaining evening of ‘Apps and Blogging‘ alright. Have you ever thought to yourself “I wish there was an app for this! ” was the question asked.

I did have some app-etising thoughts in my head, but very enthusiastic techies present in large numbers overtook my confidence pretty soon. Food bloggers were few, the techie majority hungry for bytes. My ideas just didn’t flow. On the drive back however I suddenly had a head full of possible ‘wishes’ ! Apps that would bring together a local farmer/produce community in touch with buyers … a farm to table app!

Apps that would encourage the use of local produce, suggest indigenous substitutes for international recipe, and also give a nutritional analysis of a recipe, maybe a possible calorie count too. An app that would make us think differently perhaps, support a local food and farmer community, encourage us to lean towards healthier food habits, and analyse our plates to see what we eat.

Why apps? With over 2200 million mobile handsets being sold in India each year, the numbers are only set to grow. With mind boggling numbers of 130 million users who access the internet via smart phones, it only makes business sense to step into apps! Season I at Nokia saw 38000 app ideas being offered, out of which 1200 have already been converted into apps.

Here’s one that would be on top of my wishlist for a food community at large. Since all of us aren’t recipe developers and experimenters, how about an app that offers a healthy alternative to a normal recipe? Not sure if it’s achievable, or if it’s a hair brained non tech idea, but I love the very thought. While I have the time to experiment, substitute, indulge in my hobby / obsession, a lot of food lovers might not be on the same plate.

Maybe call it a Glocal Healthy Recipe App? It would need to offer healthier substitutes for recipes, locally available alternates, a calorie count, nutritional info if possible etc. The idea is to try and stay local even with global recipes, Glocal if you like. That in turn reduces out carbon footprint, makes us support the local farmer and producer community, encourages us to think out of the box; more than anything else, experiment!

Here’s an example of a healthy makeover. This Whole Wheat Lemon Tres Leches Cake is a whole wheat version of the Tres Leches Cake {or a “three milks cake”}. Incidentally, the basic cake is also a healthier whole grain version of the pound cake. The Tres Leches is a light cake, with many air bubbles. This distinct texture is why it does not have a soggy consistency, despite being soaked in a mixture of three types of milk. Enjoy it!

[print_this]Recipe: Whole Wheat Lemon Tres Leches Cake 

Summary: Whole Wheat Lemon Tres Leches Cake … a healthier, whole grain version of an international favourite. Incidentally the base cake is a healthier version of a pound cake too, 100% whole grain. The Whole Wheat Lemon Tres Leches Cake was as delicious as it was simple and rather plain in appearance. You can always dress it up for a special occasion!

Prep Time: 15 minutes
Total Time: 1 hour plus cooling time
Ingredients:

  • 100g butter
  • 150g vanilla sugar
  • 2 eggs
  • 1 tsp lemon extract
  • 1 tsp pure vanilla extract
  • 200g whole wheat flour
  • pinch salt
  • 1 tsp baking powder
  • 1/4 tsp baking soda
  • 120g buttermilk
  • Tres Leches syrup
  • 1/4 tin condensed milk
  • 1/4 tin evaporated milk {recipe here}
  • 50g low fat cream
  • 1/2 tsp lemon extract 

Method:

  1. Preheat the oven to 170C. Line the sides and base of a 7″ round tin.
  2. Sift the whole wheat flour with baking powder, baking soda and salt. Reserve.
  3. Cream the butter and sugar in a large bowl. Beat in eggs one at a time, followed by the lemon extract.
  4. With beater on low add the flour and buttermilk alternately in three lots. 
  5. Bake for 50-60 minutes till golden brown on top, and the tester comes out clean. Leave in tin for about 20 minutes.
  6. Overturn the cake out gently on rack, and remove the lining. Turn it back on another rack. Let it cool for about 30 minutes.
  7. Gently put it back in the tin.
  8. Tres Leches syrup
  9. In a saucepan add the sweetened condensed milk, evaporated milk, heavy cream and cinnamon stick, bring to a boil, reduce the heat and continue boiling for 5 minutes. Remove it and let it cool.
  10. Once it is cool, add the lemon essence or any other flavoring you are using
  11. Gradually brush all the milk soaking liquid into all sides of the cake (including the cut surfaces) until all absorbed. Best to rest the cake in the fridge overnight to complete the soaking process.

[/print_this]

Don’t miss a post
Also find me on
The Rabid Baker, The Times of India

Baking | Sinful Chocolate Cake with Dulce de Leche … chocolate + toffee = heavenly!

“In today’s world, when many of yesterday’s fashionable habits are today’s misdemeanors, we should rejoice that a chocolate dessert can bring so much innocent pleasure.”
Marcel Desaulniers

Chocolate Cake with Dulce de Leche … a sweet beginning to 2014. Always fun to end a year decadently {Dark Chocolate Kumquat Amaranth Mousse Cakes}, and begin the next one on a clean slate. As in my case, maybe with a dose of some more decadence? Actually, it’s more of a ritual because the daughter was born on the 2nd of Jan. Every year begins with a baking frenzy, and of late, chocolate is being demanded more than ever before!

It was more frenzied when she was young as there had to be cookies, brownies, dips too. The works! As they grow up, the pressure here falls … increases everywhere else I have to add! This year was the big 18 and most of her day went with friends as expected. For me, it was a situation which reminded me of Driving Ms Daisy … I drove her up and down all day long! Since I love driving, I cannot complain!

The previous day was busier than I could manage. The cake became a rushed affair. I did have this fancy fondant cake in mind, the colours that she would have loved, with stuff on top which might have knocked her breath away etc… that remained in my dreams! Instead, between racing around like a headless chicken for two whole days, I threw in one genoise after another. Cakes baked, frosting was the next challenge. Thankfully I had a tin of dulce de leche made from an earlier batch when I did this Banoffee Pie.

Dulce de leche,” meaning candy of milk or milk jelly in Spanish, is a rich and decadent sauce or syrup, similar in flavor to caramel. Unlike caramel, however, which is made by heating sugar, dulce de leche is prepared by heating sweetened condensed milk. Dulce de leche is especially common in the desserts of various South American countries, including Argentina and Uruguay.

Might work I thought. Well it had to because I had cut it too fine. While she had a friend over to ring in her birthday at midnight, the poor mother stood in freezing January temperatures trying desperately to fill a chocolate genoise with a hair brained ‘toffee inspired‘ filling idea. Fast approaching the Cinderella hour, I ended up using an adjustable dessert ring  {one of my best buys in Sydney many years ago} and gelatin to stabilize the filling.
Thankfully it turned out fine and ‘set‘ overnight, else I might have wept copious tears. Chocolate and toffee are a wonderful combination. With less than an hour in hand, I did a quick dark chocolate ganache to frost the cake, and made some shards to garnish. There was just enough time to give it a dusting of powdered sugar, take a few snaps …

… and the rest is history! I didn’t get any shots of a slice as the cake went pretty quick after the 18 year old did the honours. I am however sure I will make this again soon. Maybe as soon as I get those cans of condensed milk into the pressure cooker again!

[print_this]Recipe: Chocolate Cake with Dulce de Leche 

Summary: Chocolate and toffee are a pairing made in Dulce de leche heaven. This Chocolate Cake with Dulce de Leche makes a fab special occasion cake. It needs a little advance planning though, like all good things in life do!

Prep Time: 15 minutes Total Time: 2.5 hours plus setting time Ingredients:

  • Chocolate Genoise Cake {x 2; I made 2 cakes and cut them horizontally each to get 4 layers}
  • 4 eggs
  • 90g granulated vanilla sugar
  • 1 tsp pure vanilla extract
  • 50g all-purpose flour
  • 45g dark cocoa powder
  •  20g butter, melted
  • Filling 
  • 3/4 thick portion dulce de leche from 1 tin condensed milk
  • 500ml low fat cream, chilled
  • 2 tsp gelatin powder
  • Frosting
  • 200g dark couverture chocolate
  • 200g low fat cream
  • 25g honey
  • Dulce de leche sauce
  • Remaining dulce de leche 1/4 portion from above
  • 15g salted butter
  • 100g low fat cream {or as required for pouring consistency}

Method:

  1. Chocolate Genoise Cake {I made 2}
  2. Preheat the oven to 180C. Line, grease & flour 2 X 8-inch round cake pan.
  3. Sift the flour and cocoa together three times; reserve.
  4. Bring some water to a boil in a large pan & reduce to simmer. Place eggs, vanilla & sugar in a large bowl. Place over pan of simmering water, and beat constantly until tripled in volume.
  5. Take off heat and continue to beat for another 3-4 minutes until the mixture cools a bit.
  6. Sift about one-third of the flour and cocoa over the whipped eggs. Use a rubber spatula to fold in the mixture-quickly but gently-until combined. Fold in half the remaining flour and cocoa, then fold in the rest.
  7. Scoop about 1 cup of the batter into the bowl with the melted butter and fold together until completely combined. Use the large rubber spatula to fold the butter mixture completely into the remaining batter. Turn the batter into the prepared pan and level with a spatula.
  8. Bake until the cake beginning to shrink slightly around the edges and the top springs back when pressed with your finger, about 40 minutes. Cool the cake completely in the pan on a rack. Cut horizontally into 2.
  9. Repeat for second cake. Total 2 cakes and 4 layers.
  10. Filling
  11. Mix 50ml cream and gelatin in a bowl. Keep over simmering water to dissolve. Mix well.
  12. Whisk in 100 ml low fat cream into the 3/4 portion of the dulce de leche to loosen it
  13. Beat the remaining cream to medium stiff peaks. Fold in the dulce de leche mixture gently, followed by the gelatin.
  14. Assemble
  15. Place 1 layer of genoise on serving platter and place adjustable dessert ring around it. Top with 1/3 of the filling. {If the cake is dry, brush it with a simple sugar syrup first {1/3 cup sugar + 1/4 cup water + 1 tbsp liqueur if you like}
  16. Repeat with the next few layers and cover and allow to set overnight.
  17. Frosting
  18. Dark chocolate ganache
  19. Place chocolate and cream in a heat proof bowl. Microwave for 1 minute at a time. Stir and repeat as necessary. Once the chocolate has melted, add the honey and whisk well to combine until glossy and smooth. Cool before using.
  20. Unmold the cake and give it a slight crumb coat with a little ganache. Set in the fridge for 30 minutes, then use the remaining ganache to frost the cake.
  21. Dulce de leche sauce
  22. While the ganache is setting, gently simmer the ingredients in a heavy bottom small saucepan. {Begin with half the cream and add as required. The amount will depend on how thick the dulce de leche is. Mine was considerably thick}
  23. Reserve in serving jug and cool until the ganache sets.
  24. Pour along the sides of the cake, allowing drips over the sides.
  25. Finish
  26. Finish the border with dark chocolate shards and a dusting of powdered sugar.

[/print_this]

Don’t miss a post
Also find me on The Rabid Baker, The Times of India

Please wait...

Subscribe to my newsletter

Want to be notified when the article is published? Do enter your email address and name below to be the first to know.
Exit mobile version